

Change the DHCP Lease Time: A particular time period is there with every IP address. The ISP always assigns the computer IP addresses to lease. It is valid for a particular duration. When the time gets up, it is essential to get the new IP address or renew the previous one.
But getting a new IP address is not at all difficult for a user. Additionally, if we focus on the DHCP lease time in general, then it is about 24 hours or can say 1440 minutes.
If you are owning Windows 10 and looking forward to changing the DHCP lease time, you are on the right page. In this article, we will highlight all the methods through which you can change it easily, and there will be no such trouble.
You may also like Best Free Antivirus for HP Laptop Windows 10
Table of Contents
What We Need to Know About DHCP Lease Time?
We all know that the smart devices we owned connected to the Local area network. This comes up with a specific IP address to be efficient for devices to communicate with each other and get connected with the Internet sufficiently.
The DHCP lease time indicates the time between the computers and router and, as a result, obtains its IP address. The router accompanies it, and whenever it expires, the computer renews it automatically.
The computer releases the IP address automatically and seeks permission from the router to provide it with a new one.
The dynamic host configuration protocol DHCP specifically focused on the router, not on the Windows 10 of the computer. Therefore before making any changes considering the DHCP lease time, understand that there is access available to the configuration of the router.
Also Read: How to Activate Windows 7 Without Product Key
How to Change DHCP Lease Time?
Right now, the scenario is so that people are quite curious to know how to change the DHCP lease time.
Before diving into the solutions for changing the DHCP lease time, it is integral to know that it is of 24 hours, but for meeting the network needs, a user can set it accordingly.
For Instance: if you are looking forward to setting up lease time on the home Wi-Fi network, the same can be restricted for a few hours, but the guest office network available can have access to it for almost 12 hours. This clearly indicates that a connection can acquire the space on the router for a defined duration. It has a major advantage in that it makes the network runs faster and more efficiently.
Finding Out the DHCP Lease Time:
With Windows 10, it is integral to find out about the DHCP lease time. If you are not sure how to find the default lease time on Windows, not to worry because the steps are as follows:-
- 1# At the very first open Command Prompt or PowerShell.
- 2# Now, type ipconfig /all
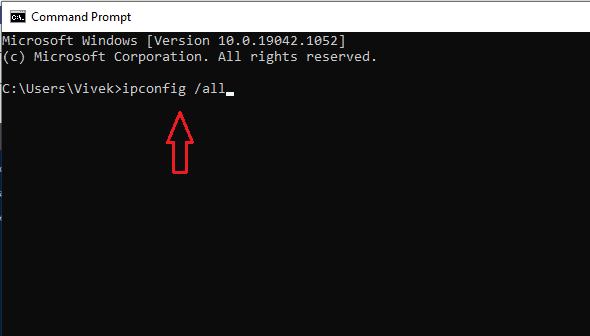
- 3# After mentioning the command, all details configuring the IP address will be right in front of you.
- 4# Now have a look at the lease obtained and the lease expired.
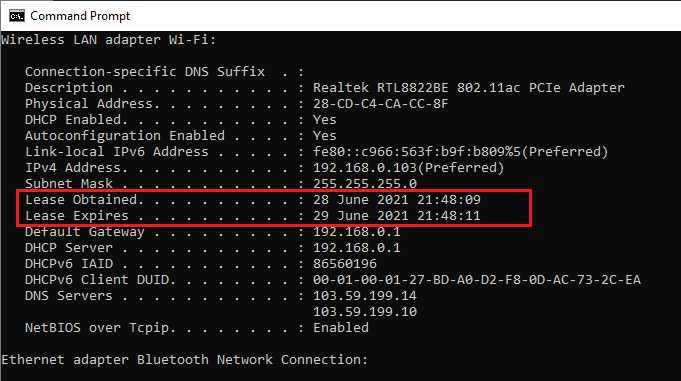
- 5# There will be a difference between these two values, and it helps you to get an idea about the DHCP default lease time.
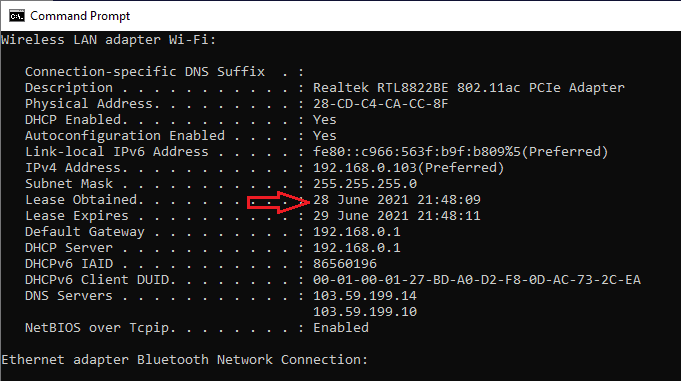
- 6# If you want to know, when DHCP lease time began, you can check the Lease Obtained. It means the time your Windows 10 computer got the IP address from your router using DHCP.
- 7# On the other hand, the Lease Expired means when your device or Windows 10 computer release the IP address and asks for a new one from your router.

Note: when you check out the DHCP lease time, it will always be less than 24 hours. It totally depends on the network configuration done by you previously.
You may also like How to Add Grammarly to Word – Step by Step
If you are a Mac OS user and you wish to find out the DHCP lease time on it, the steps are as follows:-
- 1# Move to the terminal.
- 2# Now check out the name of your device and get all the information considering the network setup and other hardware reports.
- 3# After getting an idea about the devices on the same network with respective MAC addresses will appear right in front of you, considering the name of the devices.
- 4# Now type IPconfiggetpacketdevice_name
- 5# The information appeared considering the connection.
- 6# The lease time option is available. Do check it out.
Note: The DHCP value will be in hexadecimal. You need to convert it into standard numbers so that getting an idea about the hours or minutes will be easy for you.
Also Check: How to Remove Activate Windows Watermark Permanently in Windows 10
Methods to Know for Changing DHCP Lease Time in Windows:
When it is about changing the DHCP lease time in Windows 10, it is essential to know the same cannot be done directly. A user needs to know the right steps for doing so. As it is controlled by the router, so you need to pay attention to it and get administrative access to the network router for handling the lease time. Let’s understand the right steps for it:-
- 1# Move the web browser install on your device. (It is a suggestion that instead go for Google Chrome on Mozilla Firefox. Apart from them, don’t use any other Browser.)
- 2# In the search bar, mention the address of the router. Most of the routers come up with 192.1 68.0.1 or 192.1 68.1.1 addresses. You can try any of them, but it could be different too, so check out the router installed at your place or ask the service provider who has installed it.
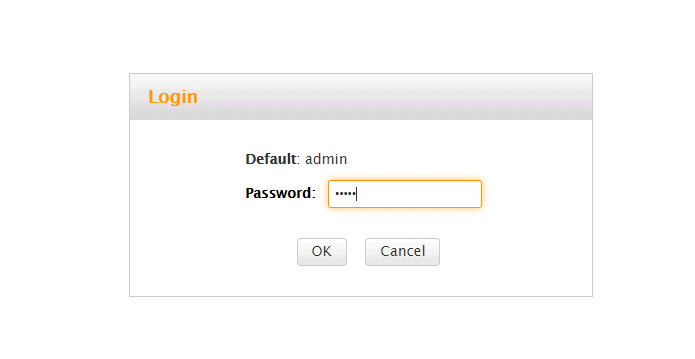
- 3# After reaching the main page, mention the admin credentials available to you and perform the sign in.
- 4# After performing the signup, click on the advanced setting category, which is known as LAN, and start exploring it.

- 6# After reaching the main page, you need to select a DHCP server tab.
- 7# In the DHCP server and lease options are available, and you need to look forward to the lease time option. The time is specified in settings, so pay attention to it.
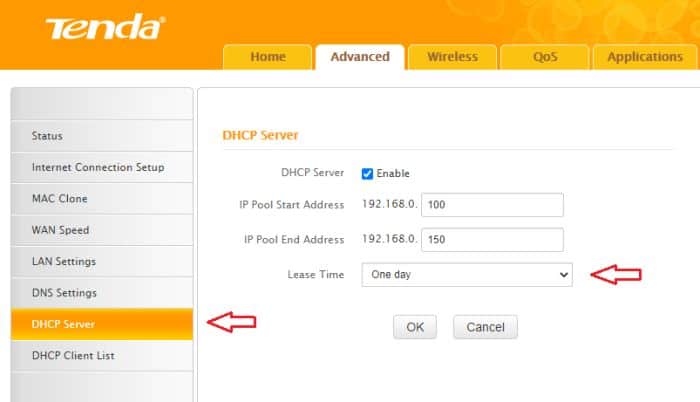
- 8# After checking it, users can simply change the DHCP lease time of the router and type it according to their choice. You can either go for a week or month or day at your convenience.
- 9# After making a change, don’t forget to save the settings and hit on apply button save, and then ok.
- 10# After it, reboot the router to apply the changes you have made.
Reset the Router:
If you feel like the methods mentioned above do not work in your favor, then we suggest you reset the router. In some cases, it has been seen that to the DHCP, lease time cannot change, and you need to deal with the previous one. Just check out the IP address conflict and then reset the device.
After performing the reset, move to the router settings again and then change the DHCP address.
You must also check How to repair Windows 10 without a CD
FAQs: Change the DHCP Lease Time in Windows 10
How long should the DHCP lease be?
If we talk about how long the DHCP lease time will be, it must last between 8 hours to 24 hours. Whenever it rain use there will be a different IP address used by the device.
How do I change DHCP settings in Windows 10?
If you wish to change the DHCP settings in Windows 10, just follow the steps mentioned above we have mentioned. If you don’t want to engage in any Hustle bustle, just reboot the router, and it will get changed automatically to 8 hours to 24 hours duration.
What are the 4 steps of DHCP?
The four steps of DHCP include acknowledging, request, offer, and Discover. A user needs to follow these basic steps so that they can get the expected result.
Should DHCP be on or off?
It depends on the condition, whether you want to on or off the DHCP server. If the router is already installed and acting as the DHCP server, then a user can disable the DHCP from the second router. But if the same is not there, then disabling the primary one is not a solution.
How do you kill a DHCP lease?
If you wish to kill a DHCP lease, then move to the services tab and hit the dropdown menu right next to the action option on the main page. Do the configuration in the static map and select the client IP address. Move to actions and then hit on delete. In this manner, a user will be able to kill a DHCP lease easily.
Last Words:
So here we come to an end and discuss how our user can change the DHCP lease time. Just consider the procedure mentioned above and get the expected results. If there is any problem arising, contact your ISP, and he will help you do it immediately.
Also Check:
- Windows 10 brightness Slider Missing – Permanent Solution
- Simple Ways to Fix Application Not Responding in Windows 10
- 5 Best Chrome Extension to Download Videos from Any Website
Scott Serrano has a computer science degree but he is a writer by profession. His writings are thoroughly creative, focused, and fully researched based. He loves to clarify people with his writing style and make them effective convince. In his free time, he is a very good football player as well.