Sometimes users feel fed up with seeing the same mouse pointer appear on the screen regularly. Well, you need to know that, it is not important whether you are using a laptop or PC. Yes, it can happen to anybody for sure.
If you have Windows 10 or any other Windows available and looking forward to how to change the cursor in Windows 10, then you are on the right page.
Here we will discuss the common steps which you can follow whenever it is about changing it. We suggest you stay tuned with us till the last so that at the end you can change it easily.
Also Read: How to Activate Windows 7 without Product Key (Genuine)
Table of Contents
How to Change Cursor Windows 10?
If you are having Windows 10 operating system available, then changing the cursor is really very easy. The steps are as follows:-
1# At the very first, move to the start menu and search for the control panel.

2# Before going with any option, make sure to select the “View By” Option and choose the Large icon to separate all the options.

3# In the control panel menu, you will see different options, Mouse settings option is there open it.
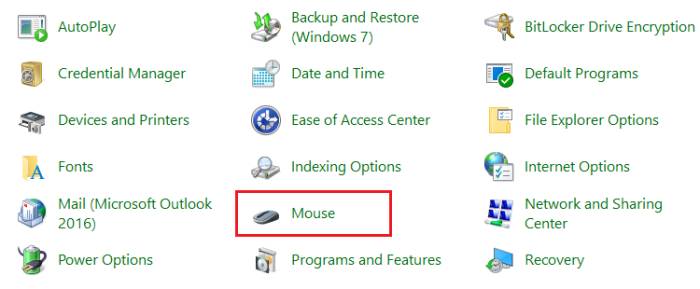
4# Now open the properties and you will see the various options available, including buttons, pointers, pointer options, wheel, and hardware.
5# Hit on the pointers option.
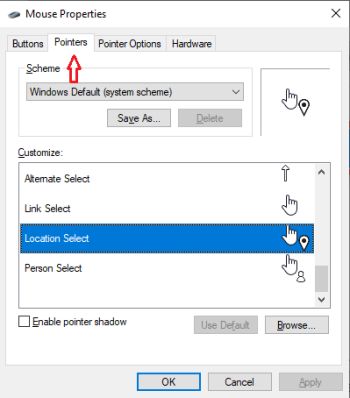
6# When you select it below the scheme section, customize option is available, and from there, you can choose the cursor.
7# Once done, make sure to tap on apply and ok button.
8# After the above process is over, the changes will get done.
You may also like How to Download TikTok Video without Watermark
How to Get the Previous Cursor Back to Normal in Windows 10?
If you do not like the cursor you have selected, there is nothing for you to worry about. To get the previous cursor back, you can follow the steps. The steps are as follows:-
1# Move to Mouse properties again.
2# Scheme section is there, just hit on it, and now select any Windows default cursor available.
3# Hit on the choose any Windows default cursor option.
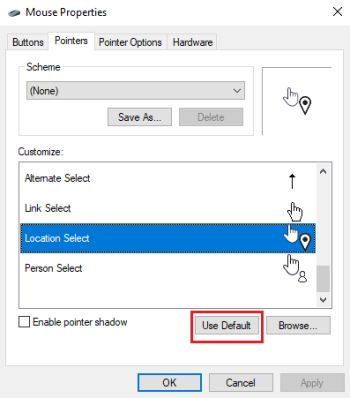
4# Tap on the apply button and then click on the Ok button.
Within no time, the cursor will get changed back to the default cursor as it was previously.
Also Read: Windows 10 Brightness Slider Missing – Permanent Solution
How to Install a Custom Mouse Cursor in Windows 10?
If you are not looking forward to utilizing the default Mouse cursor available in Windows 10, there is nothing for you to worry about because right now, custom Mouse cursors are also available that will help you to get into it easily.
But for the same, it is essential to download and save your favorite cursor scheme somewhere on your PC. After downloading it, you can utilize the same easily. The steps are as follows to get it:-
1# First of all, you should move towards the web browser on your system and search for Cursors 4u or you can directly Click Here.
2# On this site you will get 1000+ custom latest cursor designs.
3# On the left-hand side, you will see the categories of cursors.

4# You can choose one of them and download it immediately.

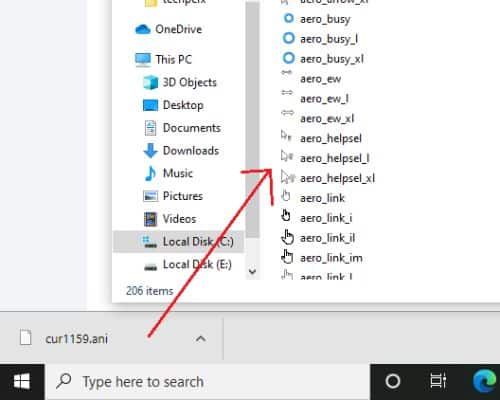
5# After downloading the same, now you need to move this file to the cursors folder in Drive C.
6# Now, open my computer and click on Local C Drive.
7# After that, you will see a Windows Folder, just click to open it.
8# Here, you will see Cursors Folder, open it.
9# Now you simply drag your downloaded file into this Cursors folder.
10# Now open the Control Panel and select the Mouse Properties again.
11# In the pointer section, click on the browse button and it will lead you to a folder, here you need to select your downloaded cursor.
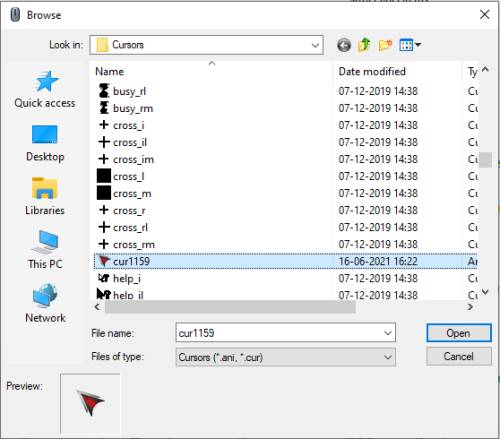
12# After selecting your desired cursor, click on Apply and OK button.
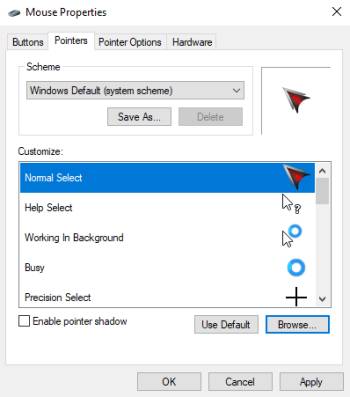
13# Finally, you have successfully changed your old cursor to a new latest cursor. If you want to use another latest cursor then you can use the same method again.
You may also like How to Add Grammarly to Word – Step by Step
Frequently Asked Questions (FAQ):
Is it important for me to get any third-party application for changing the cursor?
If you are looking forward to knowing how to change the mouse cursor in Windows 10, then we suggest you to go to the default options at the very first. There will be no need for you to get any third-party application installed on your system immediately. With the default curses as well, you can change the appearance.
Is it important to scan the cursor scheme I have downloaded on the system?
We suggest you run the antimalware of your system so that in case there is any fault with the file, it can get resolved immediately. If we have not paid attention to the same, then the chances of unnecessary trouble will be there.
What to do if I am not able to find out the selected cursor in the pointer list?
Not to worry because sometimes the cursor you have selected may not get compatible with your system at that moment, we suggest you select some other option available.
Also Check: Simple Ways to Fix Application not Responding in Windows 10
Final Words
Here we come to the end of this information, where we discussed how you can change your cursor in Windows 10 easily. The steps are very simple to follow, but it is essential for a user to pay attention to the right step.
In case there is any problem arising, we suggest you drop it for a while and try again later. Sometimes due to glitches with the system, the problem has fun, and you can’t get the results you wanted.
Also Check:
- 5 Best Chrome Extension to Download Videos from Any Website
- How to Add Google Analytics to Squarespace
Scott Serrano has a computer science degree but he is a writer by profession. His writings are thoroughly creative, focused, and fully researched based. He loves to clarify people with his writing style and make them effective convince. In his free time, he is a very good football player as well.

