
Almost everyone knows how we can stream oculus quest to twitch and enjoy it like no one else. Because yeah it is the real fun.
But wait! Do you want to enhance that fun experience by adding sound to it? Yes, you heard right. You can do this complicated process in a very simple manner also with sound in it. Let us know how can we do it.
You may also like Cast Oculus Quest to TV Without Chromecast
Table of Contents
Streaming Oculus Quest to Twitch- Full Step by Step
When we stream the oculus quest to Twitch, it definitely gets a little bit complicated process when we do it. The reason is there are so many methods present on the internet and users get confused about which method is best for them.
Also, there are so many steps to follow. So for you, we have selected the easiest of all so that anyone can follow it.
Step 1. Gathering the Accessories
So the first and obvious step is garnering all the accessories. The first two things that you will need are the Oculus quest headset and of course the audio recording device.
Requirements to stream Oculus Quest to Twitch is making sure that your personal computer has the capacity to stream VR gameplay.
At last, you need to collect a type- C USB cable. And Yes. Now we can go further to stream Oculus Quest to Twitch.
Step 2. Download SideQuest Application
The next step is to download the app from the browser. This app comes with the name SideQuest. After downloading and installing the software, make sure that you are in developer mode.
This activity will help you to enable the run of that application on your PC. For going into developer mode, you have to go to developer.oculus.com.
After then you just have to sign in with your oculus profile and you will become a free developer there. For other devices also, you have to turn on the developer mode.
Step 3. Connect the Headset
When everything is ready, now you have to connect the headset to the device. For doing the same, all you need is the USB-C cable. After connecting the headset, allow access to it.
Now when you go to the SideQuest, on the top-left side, the red color must have been changed to green. This means that the app connection is successful.
Step 4. Wireless Connection
Now comes the connection part. Anyone can play the game by connecting it through cables. But believe us, going wireless is so much fun.
When you go into the primary toolbar of the app, you will find the wifi setting. You can activate the wifi of the app, and go to wireless mode.
When you are in wireless mode, you can get rid of the headset also. Just maintain the connection to remove any hassle when streaming oculus quest to twitch.
Step 5. Resolution Setting
Many times when you play the game, the image does not come clear and looks distorted. This ruins our fun. You do not need to worry at all in this case.
For checking the resolution and the frame ratio, you can again go to the SideQuest app. In the same app, You will see a number of options for resolution and frame ratio settings.
For getting the perfect resolution that can fit your device, just make sure that are continuously checking the frame ratio. It should fit your computer.
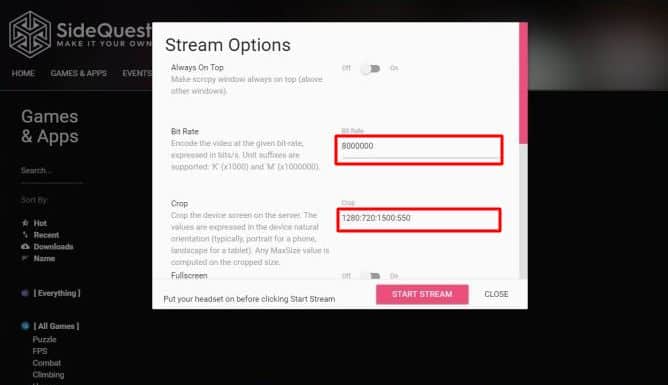
No one wants to go live with distorted images, so, be ready with all the settings.
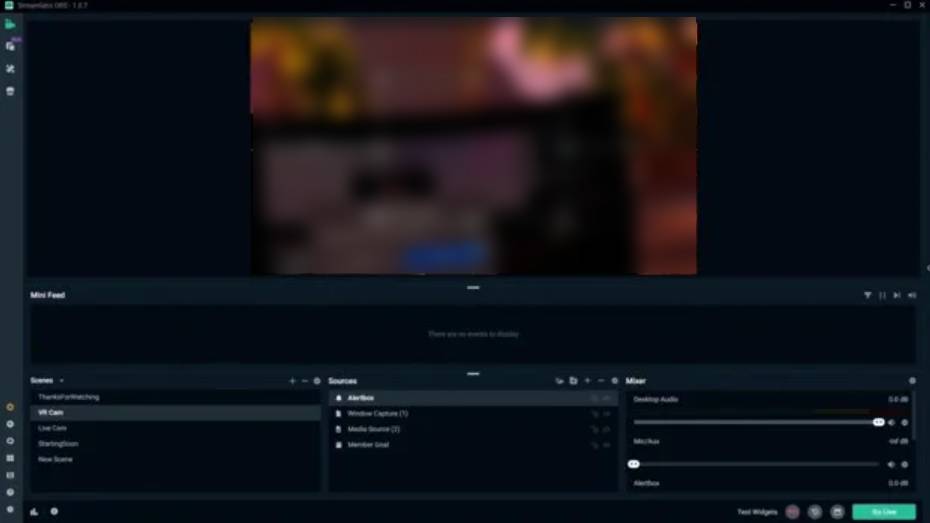
Step 6. Digital Experience
Everything is ready and you are all set to go live. Wait! Is this your first live stream? Yes of course. That is why you are here right? There is software with the name streamlabs.
You can connect that free software with Twitch and Youtube. Now no complication will arise while collecting all the content on different platforms.
There are plugins in the software same as the real-time notifications. You can also find the alert box as well as the chatbox there.
Step 7. Let us add the main part – AUDIO
Remember at the start of this article we said that you can also add the sound while streaming the game? Yes, you can double the fun after adding the audio to it.
You will not be able to listen to any sound. For connecting the audio, just select the wireless lav mic. Putting it below your mouth also with the headset can solve the problem of no sound.
Now just switch on the volume of the headset. By doing the same you can enjoy your own sound as well as the audio of the game itself while streaming Oculus quest to twitch.
Our More Recommendations
If you want to stream without many accessories, you can use the link oculus/com/casting. By using this you can stream the footage but there is a problem.
You cannot connect with the audio. That is the reason why we always recommend the previous method.
There is an application Oculus Quest 2 PC app. Also if want to go wireless, Chromecast is again a good option for this.
Also, Read Oculus Quest 2 Cast to Samsung TV
Easiest Way To Livestream Oculus Quest 2 On Twitch
Conclusion
So here we understand the process of how to stream Oculus Quest to twitch and we know it is not so simple. But a little bit of practice and dedication can make it so. With a calm mind, you just have to break all the tasks before starting them. Now just collect all the gears and start the process.
It is so much fun when you can hear the sound of the game along with your voice. That is the reason we chose this method for you. Now you can easily stream oculus quest to twitch. We hope you will like our article as well as the efforts of writing it.
FAQs –
How to get sound after streaming from the Sidequest app?
You can double the fun after adding the audio to it. You will not be able to listen to any sound. For connecting the audio, just select the wireless lav mic. Putting it below your mouth also with the headset can solve the problem of no sound. Now just switch on the volume of the headset. By doing the same you can enjoy your own sound as well as the audio of the game itself while streaming Oculus quest to twitch.
How to get the audio of both the game and streamer?
For connecting the audio, just select the wireless lav mic. Putting it below your mouth also with the headset can solve the problem of no sound. Now just switch on the volume of the headset. By doing the same you can enjoy your own sound as well as the audio of the game itself while streaming Oculus quest to twitch.
What is the stream delay?
Stream delay often called stream latency is the time gap when the capture of the moment and the same moment is shown to the viewers. This can ruin the whole gaming mood of all.
How do you view/interact with the chat while wearing the VR Headset?
Although there present a number of methods by which you can chat while wearing the headset. We recommend you LiveStreamerkit method for doing the same. You can reduce all the complexities while using this particular method.
How to stream Oculus Quest 2 to Twitch?
There are so many methods present on the internet and users get confused about which method is best for them. Also, there are so many steps to follow. So for you, we have selected the easiest of all so that anyone can follow it. You can read the above article for getting cleared.
You may also like How to Cast Oculus Quest 2 to Roku TV
Jacob Brown is a Senior Writer and editor with fabulous writing skills. He is passionate about technology and loves to explore how it works to solve problems. With a geeky nature, he also loves to travel mostly hill stations. We believe, he has the brightest talent to craft the techie process in words.