

While writing on MS Word, you use various paragraphs depending on your article or project. And when you write a line in a paragraph, all the lines keep the intended until or unless you change it manually. There may be so many reasons that can arise to indent the second line in a Word document. In today’s article, we will learn about how we can do it in the easiest manner.
Table of Contents
The Reason for Using Line Indent in Word
Suppose you are writing an article and then you feel that adding references or quotes could create a good impression. But if you start adding those references with the same indent line, it will look like they are mixed. That adds to the reason why we should know how to indent references in Word.
You may also like How Many Words Are 6 Pages Double Spaced
Difference Between First Line Indent and Second Line Indent in Word Document

The main difference between both of them are as follows-
First Line Indent
In this type of indent, the very first line is indented. And when we talk about the other lines, then remain the same in the whole paragraph.
Second Line Indent
In this type of indent, except for the first one or two lines of a paragraph, all other lines of the whole paragraph are intended.
When is No Indent
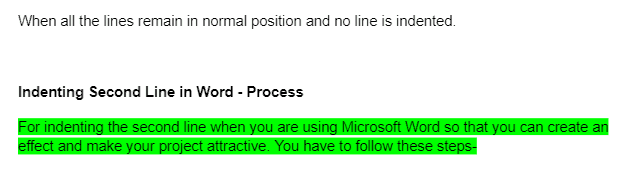
When all the lines remain in normal position and no line is indented.
Indent Second Line in Word Document – Process
For indenting the second line when you are using Microsoft Word so that you can create an effect and make your project attractive. You have to follow these steps-
- The first step says that you have to go to the line of the paragraph that you want to make indented. So by left click of the mouse drag and select all the lines of the paragraph until the last line you want to indent.
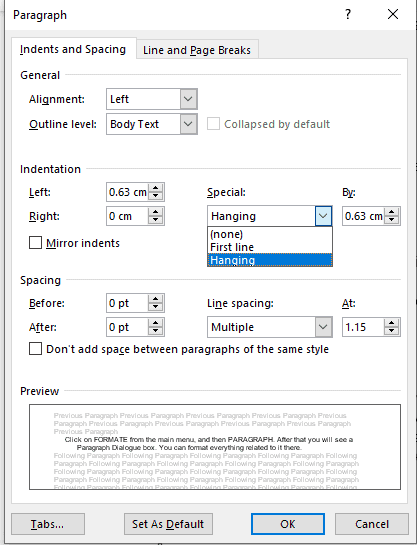
- When you go to the Word application HOME tab, you will see an arrow. By clicking that arrow, you will reach the paragraph settings.
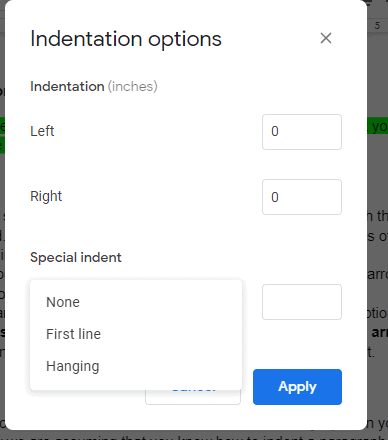
- In the paragraph settings, you will see the Indent and Spacing option. Then go to the special settings option. After that, you have to click on the down arrow.
- By clicking OK, you are saving the changes and then you can exit.
There is an option available for fine-tuning the lines and indent depth when you select the first-line indent. Now we are assuming that you know how to indent a paragraph in word.
Also read: How to Remove Headings in Word
Process of Creating a Second Line Indent in Word (Default Format)
Doing the same process, again and again, becomes irritating. If you want to know how to indent the second line of bullet in a word and that all the lines of all the paragraphs should be indented second line in a word, then follow the below steps-
Step 1: Go to your Word Document and select the desired location with the cursor.
Step 2: When you see the HOME TAB, you will find the ‘Styles Section‘ there. Select a NORMAL style from there, and then click MODIFY from the dropdown options.
Step 3: In the extreme left corner of the MODIFY section, press the FORMAT button from there. Then a pop-up menu will appear. Click on PARAGRAPH from there.
Step 4: When you click the PARAGRAPH, you will see that the paragraph setting section will appear. From there you can simply select the desired paragraph you wanted to indent.
A new document file will be created when you click on New Document based on this template which is there above the modified styles. We hope that the answer to how to indent second line of sentence word is very clear to all of you.
Hanging Indents in Google Docs File or Word File
These 5 spaces hanging indents can be utilized when we want to make our article interesting to read. We can do this by adding different quotations, references, bibliographies, examples, and so on. You have to Indent the second line in the word and the subsequent lines altogether.
How can we create Hanging Indent in WORD or DOCS
When you open the word file, you will have to select the citation. For creating the hanging indent in Word, Mac Or Docs, you will have to follow these steps and will get the answers for how to hanging indent in word.
- Step 1: Select the very first line of the paragraph.
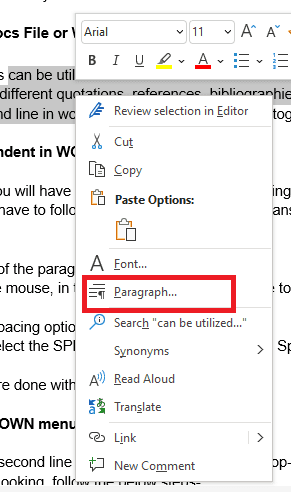
- Step 2: When you right-click the mouse, in the drop-down menu, you have to choose PARAGRAPH from it.
- Step 3: Locate the Indent and Spacing option from there.
- Step 4: There in Indentation, select the SPECIAL section. After that in the Special Section, click on HANGING.
- Step 5: Click OKAY when you are done with everything.
How can we use the DROP-DOWN menu to indent Citations.
Let us now know how to indent the second line of citation in word using the drop-down menu.
For making your citations good-looking, follow the below steps-
- Step 1: After typing the citation, use your cursor to select that citation by dragging the mouse.
- Step 2: Now, on the top-left corner, find HOME and click on it.
- Step 3: You can easily find the PARAGRAPH option from there.
- Step 4: When you see the bottom-right of it, click on the small arrow, which is presented right next to the PARAGRAPH toolbar.
- Step 5: There you can easily locate the indent and spacing options.
- Step 6: Select the HANGING option from the special indent box.
- Step 7: Click on OKAY for saving the changes.
Process of Creating Hanging Indent on the Google Docs File
The process for creating the hanging indent is a little bit different in Google Docs. Let us find out how we can do it.
Step 1: First of all, go to the very first lines of the paragraph in which you wanted changes in the indent format. Select it by dragging and highlighting it.
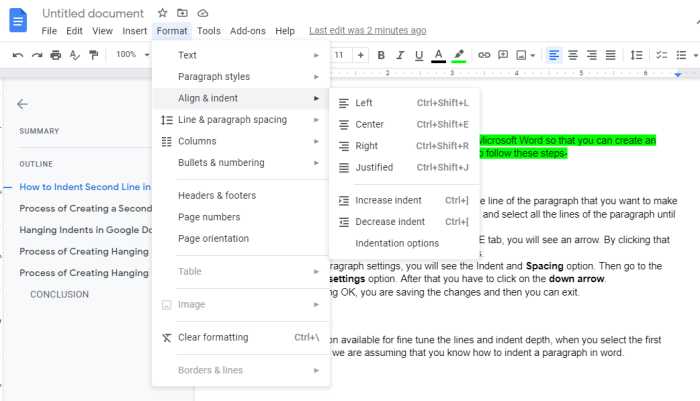
Step 2: In the Drop-down column, on the right side of INSERT, find FORMAT, and click on it.
Step 3: By clicking there, select ALIGN and INDENT.
Step 4: There, you have to select the INDENTATION option.
Step 5: Then in the Special Indent option, select HANGING.

Step 6: You can opt for 0.5 inches which is a standard unit.
Step 7: Click on the OK button.
Process of Creating Hanging Indent in Word for Mac

Now that you know how to indent the second line of a sentence word, let us now know how to indent the second line in word mac.
Step 1: First of all, select the paragraph.
Step 2: Click on FORMATE from the main menu, and then Align & indent. After that, you will see another Dialogue box with other options.
Step 3: Here you need to choose the indentation options.
Step 4: In the INDENTATION section, from the SPECIAL column, click on HANGING.
Step 5: Use a half-inch indent as a standard size.
Step 6: Finally, Click on OKAY for applying the changes.
Conclusion:
When we make any project, the main focus should be on the style in which we are writing. If you do not take care of it, it shows professionalism and is very unattractive. Try to add different bullet points and indented paragraphs to give a professional look to your project. We hope you have now understood how you can Indent Second Line in Word in an easy and time-saving manner.
FAQs –
How do I stop Word from indenting the second line?
You can change the setting manually. For that go to your desired location and select it with the cursor. When you see the HOME TAB, you will find the styles section there. Select a NORMAL style from there, and then click MODIFY and press the FORMAT and click on PARAGRAPH
And then on paragraph setting.
Why does Word indent my second line?
Sometimes Word automatically indents the second line. You can easily change the setting for enabling it. You can read our article above for doing the same.
Why won’t it let me indent the second line?
There may be various reasons for it. You can use the above-given methods for indenting the second line so that you can do it manually. In the Drop-Down menu, you will find every option for it.
How do I indent only one line in Word?
For indenting a single line, do not select the whole paragraph but a line that you want to indent. The remaining process is the same that we have described in a detailed manner. You can refer to the article above if you want to know about this.
How do you tab the second line in Microsoft Word?
For tabbing the second line in Word, Go to the drop-down menu. There you will get all the options by which you can change the default settings of indent and tab.
Scott Serrano has a computer science degree but he is a writer by profession. His writings are thoroughly creative, focused, and fully researched based. He loves to clarify people with his writing style and make them effective convince. In his free time, he is a very good football player as well.