
Are you willing to add your Facebook Page to Blogger? If yes, be ready to know much about it in detail.
Blogger is one of the leading blogging platforms, which is used by millions of people worldwide.
Blogger doesn’t only provide the new bloggers to get started with but also offers a lot of opportunities for professional bloggers as well, from setting up themes to gaining traffic towards it, there are a lot more features that make it easier for the users to work on it effortlessly.
We will not only resolve your queries like how to add Facebook Page in Blogger here but also will help you in understanding why you need it.
Also check: How to Make Transparent Background Image in Canva
Table of Contents
Why You Should Add Facebook Page in Blogger?
It is one of the most asked queries among new bloggers. It is important to discuss the popularity and features of Facebook here.
Facebook is one of the leading social media platforms, which is helping users to reach out to the maximum audience.
Blogging on Facebook brings up a lot of opportunities for the person. It is the best method to increase the traffic to your blog with just a few efforts. Blogging on Facebook is the push that can take your blogging career to higher levels without any issues.
You can make use of Facebook for directly addressing your existing fans and followers and can also build up a strong and committed community there.
Facebook is one of the favorite social media platforms that is being used by a maximum of people globally.
Adding a Facebook-like button to a Blogger website makes it easier for your visitors to reach and like your Blogger’s post. Such buttons help you in promoting your blog post online world just within a few minutes.
Also check How To View Facebook Without An Account
How to add Facebook Page Like Button on Blogger?
Adding a Facebook button on Blogger just wings up to your flight towards the blogging carrier. It is the easiest way to earn maxim success in the least possible time.
But how to do that? This is the question of millions of customers who are starting up their blogging career with Blogger.
If you are also feeling yourself in such a confusing state of mind, be relaxed and make sure to follow up on the procedure we are going to provide very carefully. The process you have to follow up here is:
- 1# Launch your web browser and then sign in to your Facebook account using your secure login credentials i.e. your email ID and password.
- 2# Once you will do it, you can easily find all of the pages being created over there on the left side of your Facebook website.
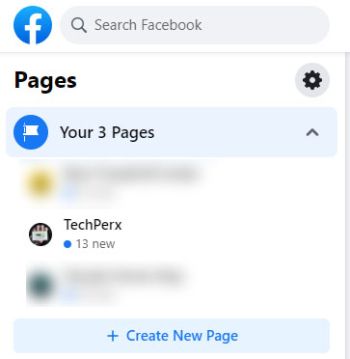
- 3# Just check and find out your Facebook page from the given options to proceed further with the process.
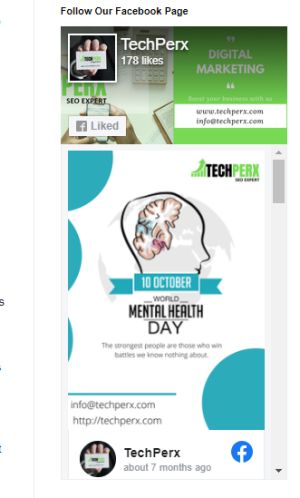
- 4# On the completion of the above process, now tap on the FB Page you are willing to add to your Blogger’s blog. Here I’m going to add my (https://www.facebook.com/techperx) page. If you are only having one, you can simply go with that also.
- 5# Once your preferred FB page has been opened up, you next have to copy the URL of your FB page. (The URL of any page is usually available on the address bar).
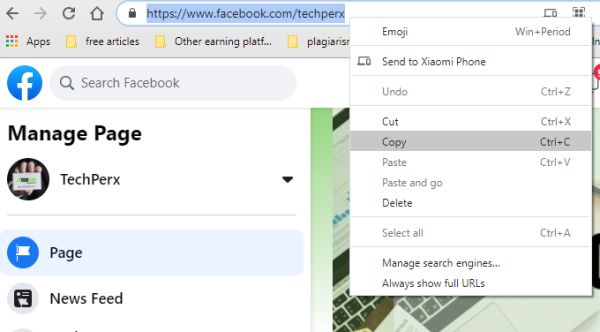
- 6# If you have never copied any URL of the page, don’t panic as it is quite simple and easy to access. For copying the URL, you just have to select the whole text in the address bar and once you are done with it, next have to right-click on it to copy it.
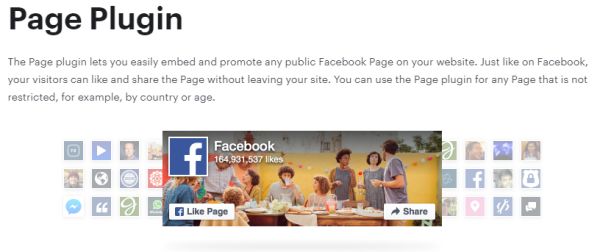
- 7# On the successful completion of the above process. Now, you need to open the Facebook For Developers Page by clicking on it.
This step is extremely necessary to move on as it will help you in making and customizing your preferable Facebook page Plugin for your Bloggers blog without any issue.
- 8# Here you will see a list of different options now. Just scroll down the list and use these options for customizing your FB page for Blogger’s Blog quite conveniently.
- 9# Once done, you next have to paste the URL of the Facebook page you just have copied above in the empty box being provided there under the FB Page URL section.
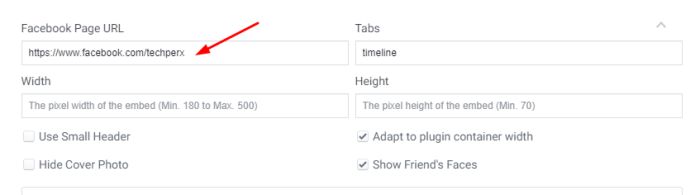
- 10# Users are here absolutely free to customize their FB Page Plugin in terms of width, height, and other things on Facebook For Developer Page quite conveniently.
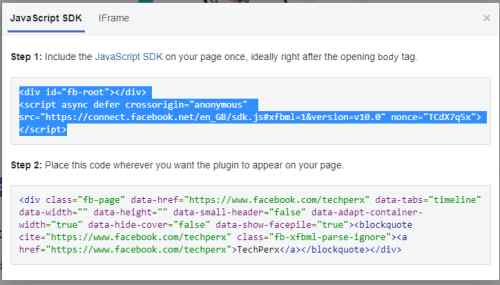
- 11# Once you feel satisfied with the customizations you have made, next tap on the Get Code button to move further with the process.
- 12# A pop-up screen will appear on that page, showing up two different script codes. You simply have to copy the first code here for going further.
- 13# On the successful completion of the above process, you next have to go to the Blogger.com page and have to sign in to it using your verified Gmail ID and password.
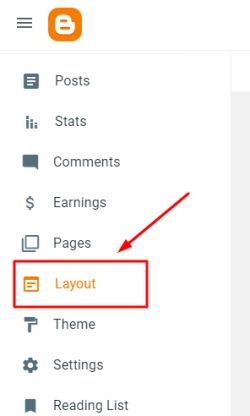
- 14# Once done, you will be landed on the homepage of your Blogger’s account. Next, launch the Blogger Dashboard and then tap on the Layout option available there on the Left Side of the Blogger website.
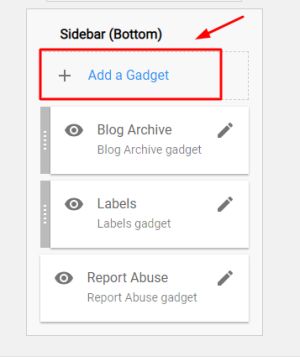
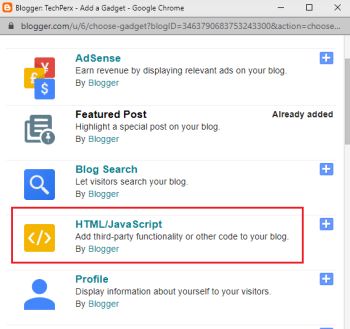
- 15# Once done, now you have to add an HTML gadget here. For enabling it successfully, just tap on the Add a Gadget option on the place where you are willing to add your Facebook Page to your Blogger’s website.
- 16# Next, you have to select the HTML/JavaScript option to proceed further.
- 17# On the completion of the above process, you next have to paste the first code of your Facebook Page Plugin you above have copied.
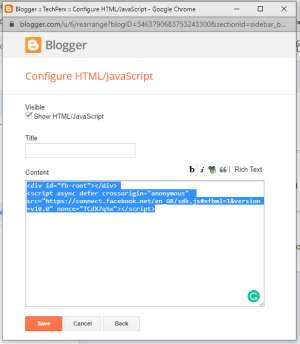
- 18# Next tap on the Save button to make the changes successful you just have made.
- 19# The next thing you have to do in the league is to go to Facebook for the Developer Page again and once done, you next have to copy up the second code being mentioned there.
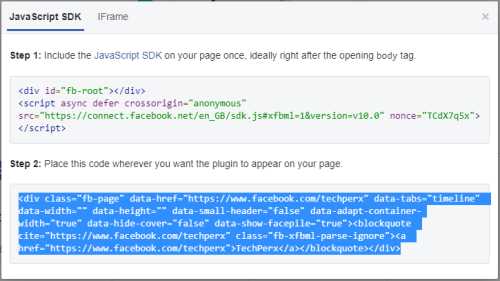
- 20# Once you have copied the second code successfully, you again need to get back to the Blogger account followed by typing on the Layout Option and then again select Add a Gadget option.
- 21# Now select the HTML/JavaScript and paste the second code you have posted above in the empty box being provided there in the preferable location. Users are here absolutely free to give a title to the button you are going to add on. You can use frames like Follow Our Facebook Page or Like us on the FB page here.
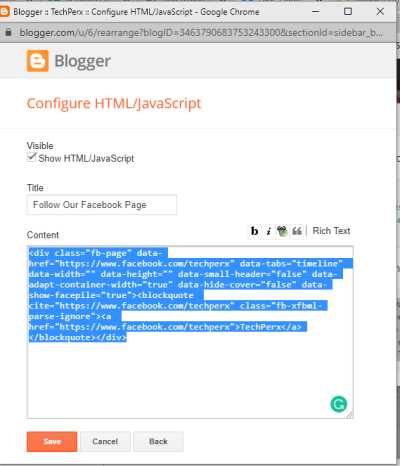
- 22# Once you are done, just tap on the Save button to move further.
- 23# Bingo! You have successfully done with adding Facebook Page in Blogger’s Blog.
- 24# You next, have to go to your Blogger’s website and have to check whether the same is perfectly working there or not.
Conclusion
I hope you guys have succeeded in resolving this guide. We have tried here to add up every single detail here so that our readers could access it quite conveniently. You can now add the Facebook page to your Blogger’s account and can take your blogging career to the next level. If you still have any queries, you can ask them in the comment section anytime.
Also Read:
- 10 Best Free Shooting Games for android
- How To Download a Video From Facebook
- How to find Facebook Video History
- How to Hide Last Seen on Facebook and Instagram
Nanette Silva is a full-time content writer and a part-time sports addict. She enjoys writing about social media topics and loves to explore new pieces before crafting in her own way. Strong at playing with words and expertise in finding new features on social media platforms.